Neil from Messick's here to talk you through a project that I've been working on and bring a conclusion here to a set of videos that we have done. I was out here doing some of my own work here for the last couple of weeks and we went through here with several implements and talked through the function of different implements that are used in lawn and turf preparation as I did some projects here at my own home. Started with a preparator coming out here into this lot where it was just finished by the contractor out here doing all of the dirt work, use that preparator to come through and process that soil, break up the clumps, smooth everything out, and remove the rocks.
Followed up through that with a Land Pride slit seeder, came along with that, rolled over all of the rough spots, and got them smooth. Cut some grooves into the soil, dropped seed down into those grooves, and packed them flat. Then took a hydroseeder out of our rentals department and came out here and applied the fertilizer and that tackified the glue there to stick everything down. Long process that it takes to put it down a new yard.
In preparation for coming out and doing this work, I watched a lot of videos of other lawn care people on YouTube, the guys that go out into the little garden patch that they've got in their backyard and try to make the perfect lawn. One of the things that always annoyed me about those videos was that the person would go through and show you the work that they did and talk about what they were doing, but you never got to see the end results. You never got to see how anything came up.
Today, I'm going to walk you around my lawn here and show you how things have gone. One of the great things about working out here with all of those implements was it was a really good place to see how these different implements would perform in different conditions. Over an acre and a half out here, I've got rolling hills, I have wet spots, I've got dry spots, I've got rocky areas. There's a little bit of everything, and you can see that in the way that the grass has emerged here when we go through these different spots, things came up and grew differently depending on where they were planted.
Unsurprisingly, you can look here behind me and you see a lot of green. Obviously, things have come in pretty well. I was really happy. I'm a month in at this point, almost exactly. It's exactly a month since we started putting actual seed down into the soil. It didn't take but a week before you could start to see the grass coming up through the soil and things starting to emerge. On the emergence side, I was really happy how all of this came up and we look across these different areas, a lot of the seeds sprouted and I attribute that to being able to come through with that seeder and drop the seed right down into the soil itself, rather than broadcasting it out on top of the dirt or running the seed through the hydroseeder, including it in that slurry mix.
Using that slit seeder did a really good job of that seed-to-soil contact. Something we talk about in agriculture a lot when we're planting in fields works here on the turf side as well, and having the seed actually against the dirt, in the dirt makes it germinate and grow much better. Very cool. The place that I'm standing right here is against this tree line, and on the property out here, it's probably the wettest area. Even when things get really dry out here, you'll see some darker soils and stuff from the dampness that's in it. These are some of the areas that probably as far as that fine blade grass goes have really come up the best. You've got a nice green carpet across here and not a whole lot of weed content.
As I come across over here to the sand mound though off to the left, this is soil that was really disturbed a lot. Right off here against the tree line, the heavy machinery and that stuff didn't do all that much work, but obviously, a lot of soil was moved around up here. There's been a lot of settling that's happened up here and you can see that in the grass, there's some rolls and stuff in here that after I ran across with the tractor, left some ruts and stuff behind. I have some of the areas here showing a little bit more weed content, some of this stuff right in here. This longer blade grass that wasn't part of my seed mixture is starting to come up in the form of weeds.
If you watch that series of videos, you'll notice that while I was out here working, I had a dumpster and a porta-potty that was left out here in the front yard while I was out here working. That's an area that I didn't do any work in. Didn't prep, didn't plant, but it's actually created an interesting test case. This would be almost an untouched area with all the implements and seeding and fertilizing work that I did that gives us an interesting A/B comparison to how this area has developed compared to the rest of it.
You can see over here there's a little bit more clover coming up. I have a lot more hard bare spots, real weeds. I have some broadleaf grasses and stuff, grass weeds coming up with the rest of the grass that I planted. You have some actual legit weeds in here and you remember I come across with roundup and stuff and killed a lot of this stuff off initially, but all of that is over here in the areas that I did not treat. I have some weeds and stuff coming up across all this other area, but for the most part, it's coming up really nicely, especially when you compare it to the untouched areas.
One of my biggest concerns in getting out here and doing this work quickly was avoiding the potential for runoff. Now, being that this is a newer construction and having to deal with all the regulatory stuff that has to happen today in modern construction, I have a pretty extensive stormwater management plan, which let me tell you is such a joy. One of the things that I was concerned about was that after I had come through with the preparator and cleaned up the soils, that thing's got a spinning drum in it, knocking the rocks out, of pulverizing that top layer, 2 inches of soil or so, that if we had a big rainstorm come through that would've catched all that soil and washed it off down into my stormwater management pits.
Now, I was worried about for two reasons, not just collecting that stuff in the bottom of the pit and potentially changing the grades and that kind of stuff, but I wanted that soil, that good topsoil up where it belongs so that my grass would grow well. That's part of why I went through with the hydroseeder and used that then to stick all of that soil down. In doing that now we've had two rainstorms would've liked more, but two pretty significant rainstorms and I haven't had significant washing problems.
When you see all these swales and stuff, I only have one small area in the back over there where I probably didn't put down enough of the paper product to stabilize the soil, but I got a little bit of washing in, but for the most part, that has worked really well and I haven't had problems. My seeds stuck to these sides here. It didn't wash down the hillside in the rainstorm, and all those soils stayed in place where they belong.
One of the cool things that I did down here was build a tractor shed underneath my deck. Put a small deck up here over top of us, and we put these two-by-fours and stuff on the side of the deck in order to create these barn doors to be able to have a little tractor shed underneath of my deck. This is a much more cost-effective way to create storage for equipment than having to build a separate outbuilding or some barn, but you notice here around the bottom and up the side of this, there's a lot of chunky soil left. I still have work to do out here. There's several aspects of this that are going to be ongoing projects for me for a while.
I need to go along with some tiller and break up the soils and stuff right up against the house. As I was going around with that preparator, one thing that I wasn't able to do was really get close up against the house with it on such a large piece of equipment. I'm going to use a little handheld cultivator or something to finish the job up against the edges of the house and clean up those chunks and probably hand seed back into there a little bit more. While I'm really happy with how the Land Pride seeder has done out here, there is seed everywhere. You're not going to find patches and that kind of stuff where that thing missed was very consistent in the way that it put it down.
I am going to have to come in through here probably at some point and oversee again over top of this a second time. I set about 100 pounds of my grass seed aside, planning on coming back through here in the fall when the growing conditions are a little bit better in order to fill in any gaps that develop between the different clumps that are out here. That's been going really well. I wouldn't encourage planting grass seed in June like I had to do here. I had these concerns about stabilization and getting out here and getting stuff down on the ground, but generally, seeding is supposed to be done in the early spring or the fall when these grasses are going to grow the best.
I've struggled out here to really try to do my best to water. New grass coming up like this needs a lot of water, and keeping water across such a large area has been really complicated and difficult for me. I've got a couple of my own projects going on with that, with finding more places to get hoses and water and stuff out here to get on what we can, but so far we've been pretty lucky to have a significant storm about every 10 days or so, but goodness, I'm out here stressing on those days in between as things look like they're starting to dry out. After doing this much work, the last thing that you want to do is sit and watch this stuff brown up.
That's what I'm doing when I go home for work anymore, is finding ways to put water down out here and keep all of this going. I hope that brings a little bit of closure to this for you. If you're going back and you're working on a project like this, these prior videos that I would've done have been linked down here at the bottom so that you can go back and see the different steps of running the machinery in order to put down a new lawn like this. I hope you're glad to be able to see the end result of this, right? A little bit different than a lot of the lawn care guides on YouTube that were showing the process but not the end result.
It doesn't come out looking perfect right away. There's weeds out here. I'm going to come through and spray some of these off again here after a while to try to get the weeds out of the grass. I'm going to be working on this for a little while longer. Probably not going to take you along on that journey, but let's give you some of the end result while we're out here. On the equipment side, if you're looking for any machinery or if you have parts of service needs for machines you already have, give us a call at Messick's. We're available at 800-222-3373 or online at messicks.com.
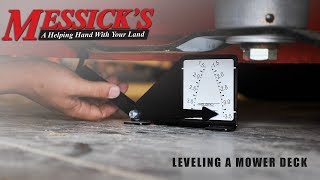
Mower deck that's out of level can cause a whole host of cutting problems and performance issues. Generally, when a mower deck is out of level, you'll generally see that your one side of your cut is just a little bit higher than what the other side would be, leaving that step at the end of your deck. If you go through a couple steps here with me today we can eliminate that problem, make sure your tractors performing as well as possible.
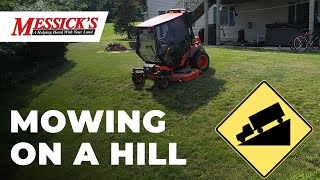
Neil from Messick's here out today at my father-in-law's house. We're helping him out a little bit here today. The transmission belt tore on his mower in the middle of cutting his grass. He's got a big swath here left over that I'm over here helping him take care of today with my mower. You can see here that his yard is a challenge to mow. It's fantastic for sledding in the winter time, but a bear to take care of here during the summer to get the grass taken care of. So we're going to do a little bit of talking while we're out here cutting his grass today, about mowing on a hillside. There are safe ways to try to keep yourself from riding down the hill and also a couple of techniques that you can use that if your mower does break loose and slide, to help to recover a little bit from a dangerous situation. Come along here with me today, as we do a little bit of good this afternoon.
Cutting grass on a hillside is no joke. You may think you're just out-cutting a lawn, but actually, this could be deceptively dangerous. This one's a little bit personal to me because about 10 years ago, I actually had a customer kill himself on a Zero Turn mower. A gentleman was out on a hillside, the machine, slid down the hill and went over the top of an embankment, which was ultimately his end, unfortunately. There are a couple of things that you could do out here to keep yourself a little bit safer. We're going to talk today a little bit about the ways to go up and down a hill safely maybe when you're traversing one across the sides and techniques to keep yourself stuck to the side of the hill, and if the machine does break loose and slide. A couple of the techniques that you can use to hopefully drive out of it safely.