


Land Pride #380-289A BX80 Series Land Pride Third Function Valve Kit
$1157.31
For Kubota 80 Series BX Tractors. This also includes the BX23S.
Install Instructions
Dealer Install Instructions(Colored Copy)
This LandPride kit is often refered to as a "true" 3rd function because it can be operated using only an electroic button on the loader stick.
There is also a cheaper Kubota branted kit BX2412 that is a diverter. In this case the loader stick button diverts the loader curl function to operating the 3rd function remote.
This does give some flow control, but can not operate at the same time as the loader's curl function. This version of the kit works best for thsoe who remove their loader often, as only an electronic wire needs disconnected. The LandPride version requires hydraulic hoses to be unhooked.
www.messicks.com/part/BX2412/bx-80-series-oem-3rd-function-valve
This part fits 5 models
Product Specifications
| Property | Value | |
|---|---|---|
| Brand | Land Pride |
Installation Tips
This is not overly complicated if you are mechanically inclined. I read a lot of reviews about the difficulty of routing the hydraulic lines around drive shafts... spinning fans... etc. There is a ton of room, and multiple routing options. I didn't find it difficult at all!
EVERGREEN, CO
Steve
Download the power point from messicks website as i feel they are alot better as the paper instructions that come with are very poor. I would say it will take 3-4 hours of time but I took my time and zip tied all neat and out of the way. It is a very high quality kit.
WILLIAMSBURG, IA
Brad

$8.52


$14.95

$5.02

$13.23

$19.18

$16.53

$14.99

$9.95

$49.95
$8.52
$14.95
$5.02
$13.23
$19.18
$16.53
$14.99
$9.95
$49.95

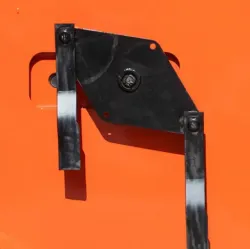

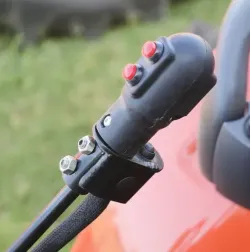

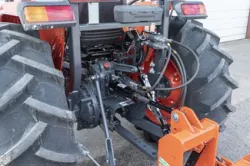
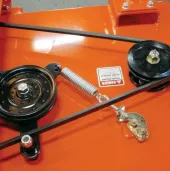


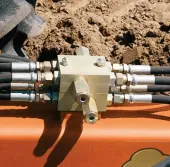


The kit was fairly straightforward to install. It took some work to route the wiring harnesses and the hydraulic hoses through and underneath the tractor. Between the included instructions and the color “Dealer Guide” I found online, it went decently enough. The front hydraulic hookup shows the left side fitting hydraulic hose being routed underneath the right side, but I found it was installed a little cleaner if it was routed on top. Both hoses have to go through a small bracket on the left side of the loader tube and then inside the left loader arm, which is pretty tight. The directions show mounting the solenoid bracket first, then mounting the solenoid. If you already have the loader on your tractor, you will NOT be able to do this with the support arm installed. Mount the solenoid on the bracket, then install everything on the frame of the tractor. You will also have to temporarily loosen or remove other hoses and/or fittings to remove the hydraulic hose that goes from the power beyond port to the side of the loader valve, as well as getting the two new hoses installed and routed. The pictures are hard to see, but as long as you follow the existing wiring harness that runs diagonally under the tractor which already stays clear of the fans and driveshafts, you will be fine. Make sure the correct hose is connected to the appropriate port on the solenoid block. The hoses are nearly exactly the length needed, but there is a little extra length on the wiring harnesses. Any extra can be coiled inside the battery compartment. The connector to the lower solenoid is very difficult to plug in because it is so close to the mounting bracket. I had to cut off part of the connector itself to get it to clear the bracket, but it did not damage anything. Routing the harness down through the rubber boot was tricky but doable. Just make sure it can’t get pinched by the valve mechanics and it’s fine. As always, check your hydraulic fluid level when you get done and add as needed because some oil will drip out of the hoses you had to move or remove, plus many get installed that are empty.
KNOXVILLE, TN
GRAHAM