

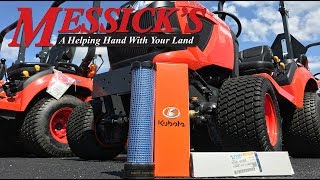
Kubota BX25 Operation and Overview
Tags : bx1870 | bx2370 | bx25 | bx2670 | kubota |Today we're going to do a short review on the Kubota BX25 Sub-Compact Tractor. We're going to walk around here and do a layout on what the basic controls are on this machine, give you an idea of how to operate a machine like this. The concepts that we're going to cover here are going to apply to most Kubota products specifically those in the BX series. Today that would be the BX25, BX1870, BX2370, and BX2670.
Take a quick walk around here with me, see if we can teach you a couple of things today. All the tractors in the BX series are diesel. If you're not familiar with a diesel tractor before, the one biggest difference is where a gas engine would have a chock, diesel engines have glow plugs. On a warm day like today it's not really necessary to use the glow plugs on a diesel engine but in a day when you get below about 40 degrees or so, giving a couple seconds to heat the core of the engine using the glow plug is a good way to make the engine start easier.
On the left-hand side of the machine is a brake and when you press the brake pedal down and turn the key forward, the tractor will start. The very first position here on the key switch is a run position, as you go a notch further you'll hit the glow plug and you'll see here I light an orange light up here on the dash and the glow plug is engaged. When you're heating a glow plug typically you want to heat it in about 10 or 15-second intervals, heat for about 10 or 15 seconds and then start the engine.
If it doesn't want to go, heat it for another 10 or 15 seconds and then start the engine again. You don't want to let the glow plug run for minutes at a time as it's a heating element, if it gets really really hot, it can shorten the life of the glow plugs and eventually they would have to be replaced. When it comes to your glow plugs, short intervals between trying to start the engine in order to get the thing going. Once the tractor is running, you have a throttle right up here on the dash.
These will idle around 12 to 1,400 rpms and be wide open around 32 to 3,500 rpms. A lot of people when they're running the tractor like this they like to run at lower revs just to not use as much fuel and keep the noise of the engine down a little bit, that is fine. Do remember as you add more revs to the engine you're going to have more hydraulic flow and more hydraulic pressure. Most things on this tractor are operated hydraulically, so you don't have a whole lot of power at idle.
But once you get up to about 50% and higher you start to pick up enough flow and pressure that it becomes very operable at that point. On a hydrostatic tractor, you'll have a pedal down here in the floor for forward and reverse and also a gear selector over here on the side for your operating range. The BX series tractors have two operating ranges, either a turtle for low or rabbit for high. The turtle is generally about zero to four miles an hour, the high range is about zero to eight miles an hour.
Generally, in the lower range we recommend using that for loader work and pulling and tugging and that kind of stuff, tractor work. The high range is generally used for transport mowing chores. As you push down the pedal here to go forward if you think of this like a gear selector, the harder you press this pedal down, the higher gear you're in. If you need to pull hard, you pull hard in a hydrostatic tractor by pushing gently on the pedal.
As a guy, when I want to go hard, I push hard and that effectively puts you in a higher gear and gives you less pulling power. If you have a heavy load behind you or you're trying to push your loader into a compacted pile of dirt, pressing gently on the pedal will give you more forward push than mashing it the whole way to the floor. Being that this isn't mechanically operated hydrostatic you do get a little bit of feedback from the transmission about how hard the tractor is working.

When you push the pedal forward, you can feel the transmission pushing back at you a little bit and when you start to over exceed what the transmission can provide, you'll start to feel almost it can describe it as the bottom dropping out of the pedal and what you're feeling is the transmission going in to relief. When you've pushed as hard as what the transmission can push, there's a safety mechanism in the back of the transmission that will allow that hydraulic pressure to relief out and you could feel that in the pedal.
You get a good mechanical feedback from this treadle pedal by going back and forth and just keeping in mind that the harder you press this pedal down, the higher gear you're in. Your two orange levers over here on the side take care of the movement of the tractor. Here's your range selector that we just talked about with turtle or rabbit and a neutral position here in the middle or your four-wheel drive which is right up here in the top. These are international tractor symbols that you'll find on any machine.
The disengaged broken version here in the middle shows that the four-wheel drive driveline is disengaged. This forward position is the engaged position. To and forward make a heck of a lot more sense but Kubota uses the international tractor symbols that you'll find on any machine and so you'll see those same symbols on any tractor. Both of these orange levers here are straight cut gears, so when you're pulling on one of these you see right now it doesn't -- there it goes, see if I can get one stuck.
No, they're not sticking right now. If you're tugging on one of these levers and they're not wanting to drop in, it's because they're straight cut gears and what that means is the teeth of the gears are bumping into each other and they're not wanting to slide forward. If this is happening and you're tugging at these levers and they're not dropping in place, all you need to do is tap on the tractors drive pedal a little bit and roll the tractor forward just a little bit to get the gear set to rotate a bit so that the teeth will want to drop together.
Generally, that happens most often with the range selector if you're sitting on a hillside or something and the transmissions loaded up. Just gently tugging on that lever while you bump the transmission drive pedal forward will cause that to hop right into place. You'll find that on any tractor on any transmission where straight cut gears are involved without synchronizers and the things that we get up in big utility tractors. The next lever on this panel over here is the quarter inching valve for the 3-Point hitch.
This has two positions in it either a small inching position if you just need to make a small adjustment to the hitch you just tap it forward or tap it backwards and it will move up or down very slowly or you can go to the extremities which will move your attachments very quickly. Most of the attachments that go on small tractors like this are usually operating a full up or full down position so generally, you're just throwing the lever to one side or the other.
Down here between your legs is also a dial. You'll find this on every tractor with a 3-Point hitch, 3-Point hitches only have a lifting force up, they don't have downforce down. Because of that, a 200-pound implement drops a lot slower than a thousand-pound implement would. This valve right here changes how much restriction the 3-Point hitch has when lowering itself. If you have this thing dialed the whole way closed and you push your 3-Point hitch control lever down and the 3-Point doesn't move, it's because you don't have enough weight on there to displace the fluid and allow the 3-Point hitch to drop.
In which case, all you need to do is reach down here and open that valve up a little bit and then move your control down. Likewise, if you have a big heavy implement on there and you tap your 3-Point lever down and that implement drops like a rock so quickly that it's uncontrollable, closing that valve off a little bit will give you a nice smooth downward motion. This tractor is not equipped with a mower deck but if it was this dial right here is what you would use to set the height of your mower deck.
Since there's no deck here, I can't turn the dial but you'll see that there's a little height indicator right here at the back and a one through four and top position right here. In order to change the dial when the deck is installed, you first need to lift the mower deck up and off of the mower deck stops. Then you turn this dial to the cutting position that you want and lower your deck back down again.
If you want to have it in a transport position in order to do some work while the mower deck is installed underneath the tractor, you can lift the deck up, turn this dial to top and it'll lock the deck up as high as possible. One really nice thing on these Kubota tractors is that Kubota does a great job of getting that mower deck clear up against the bottom of the tractor. You'll notice that these machines had industry-leading height underneath the mower decks allowing you to work without having to pull the deck on and off all the time.

It's a really nice feature and really easy to adjust up here from the seat. Back here at my heel is the lever for the differential lock. These tractors are four-wheel drive but if you get them hung up in the mud and you get that situation where one wheel is spinning and the other wheel is sitting still, you simply step down on this diff lock to lock the differential. If you're not aware of how a differential works, typically on your two rear tires when you're in situations that you're turning and one needs to spin faster than the other, the differential allows those wheels to turn at different rates.
That becomes problematic in the mud because one wheel will sit still and the other wheel will spin. When you step on that diff pedal, you first want to stop the wheels from spinning, step on the diff pedal, and then go back to the forward motion again. The reason why you want to do that is because when you step on that pedal, it's sliding a pin into the differential. You don't want to slide that pin in while the diffs are sitting there and spinning because you could shear the pin off.
It's important to stop the wheels from turning, step on the pedal, and then go back to forward again. If you come down here to the right-hand side or left-hand side rather or by engagement levers from my PTO, so I have a middle position that will operate both PTOs, a forward position to operate the rear at 540 rpms or a rear position over here to operate just the mid-mount mower.
Typically you're in either the forward or rear position but the time that you want to operate both PTOs is typically if you're using a powered bagger where the bagger has a fan that runs off the rear PTO and then you need to have your mower deck on as well. Once you've selected which PTO you want, you move this hydraulic lever forward in order to engage the PTO.
The nice thing about the way that these levers work is there's a little bit of cushion in here so as you bring this lever forward you can bring your implements up to speed a little bit more softly than just snapping them in with a button. That's really nice, easy to use, push it forward, off it goes. Kubota has gone through several iterations of dashes in these tractors and this last one here appears to be the best of them.
They've done a lot here to try to seal water out. You can see a lot more gasketing and stuff around the edges here at the dash. There’s also some new indicators on here as well. As tractors have gone by, we’ve flipflopped back and forth on what things we’ve shown on the dash. But in this current tractor, we have a nice analog gauge for the tachometer. Our meter down here in the bottom, temp gauges and fuel gauges all digitally shown giving you the amounts and not just lights, which is really nice.
There are also has some indicator lights on here as well for things like oil pressure, battery voltage, your glow plug indicator that we were pointing out here before, headlights, turn signals, four ways so that you can see what’s going on. You can also see that the indicators are backlit as well so if you’re out there operating in the night in the dark, you can see exactly what’s on your dash. Right down here below is the multifunction switch to operate all those lights.
The yellow lever right here will do our turn signals. The switch here will do our four ways or the lower switch will do the headlights. With this tractor with the four ways turned on and an orange triangle on the back, you can drive down the road for short distances like a piece of farm equipment. Make sure to check what your local regulations are here because there are a lot of limitations on exactly where you can go to be doing that safely.
Make sure to check what your local ordinances are before you just take off down the road. There’s also a little latch lever on here for a cruise control. I’m not a big fan of cruise controls myself but you pull this lever up to latch your hydrostatic pedal in place. If you’re going to go out and mow, say, several acres at a time and you want to be able to take your foot off the pedal, it is nice and can relieve you from having to hold that thing down for a long periods of time.
The loader stick is right up here on the top of the tractor. We covered in a loader video that will be linked here at the end of this YouTube video. I’m showing exactly how the loader works, and there’s a lot of detail on the different positions on this loader valve. If you have questions about that, make sure to hop over to the loader video here at the end of the clip. Periodic maintenance on the tractor like this is really important as well.
When we look at tractors for trade-ins, it’s very evident to people who care for the tractor and check on things and those who don’t. It’s a good idea every time you run one of these machines to take a look at both your radiator screen and your air filters. When you’re working in dusty dirty conditions or grassy conditions, a lot of times these things can plug up. Right here on the inside is a simple pre-screen for the radiator that you can pull out and shake off any dirt or anything that happens to make its way through.
This radiator actually pulls this direction. Most of the time, the worst messes are kept up by your legs around the radiator but this one will actually catch some further debris before you get to the radiator core itself. The air filter is right here. There’s a little nutty on the bottom at the air filter cap that you can squeeze down here in order to let big debris just simply drop out of the canister. That’s something that’s easy to do.
You need to go the step further, the lid right there pops off and it’s easy to pull out the air cleaner itself if you need to clean off grass or debris. If the engine never starts to smoke or lacks power, most of the time it’s because that air cleaner has been plugged up because somebody hasn’t been keeping after it. The dipsticks and the coolants are also right here at the top as well. Right here is the coolant. If you’re standing where I am, you can see the level right down there at the bottom.
The dipstick for the engine is right here at the top. We’ve been running this machine but if you check it before you start, you can easily see where the indicator is right there. If you need to top it off, everything is right here at the top. Kubota does a nice job at designing these engines and laying things out so that you don’t need to pull side covers all for cowlings or tear the engine apart to really get down to where the guts of the engine are to check your periodic maintenance items.
If you have a loader or a mower deck on your tractor, it’s generally recommended about every 10 hours of operation, you run around with a grease gun and hit all the grease zerks. That’s important on the mower deck spindles because a lot of heat is generated from those things spinning very quickly, and on your loader where all of your pivot pins are at. All those pivot pins with the stresses that are put on the loader will wear over time if they’re not greased.
You can look at a tractor with a thousand 1,500 hours on it where somebody didn’t grease the pins and grab that loader and shake it back and forth because the pins hadn’t been greased. Keeping it simple, a $20-grease gun around with a tube of grease that every couple of months or every 10, 15, 20 hours or so, 10 hours is recommended, run around with that grease gun and hit all the grease zerks on here. That extra two or three minutes that you take before operating the tractor will really ensure that this thing serves you for decades to come.
That’s the operation of the Kubota BX series tractor. We’ve done a whole series of videos on this series of tractors because they are so popular for us. We here at Messick's sell a little just about 200 of these things a year. To see the operation of the backhoe, click right up here. To see the operation and function of the loader, click up over here and see the selling features of this tractor, right down over here. Give us a call at Messick’s. Let us know if we can help. We’re available at messicks.com or at 800-222-3373. Thanks.
More Articles

Kubota BX-series Filter Kit and Service Overview (*NEW* BX 80 series)
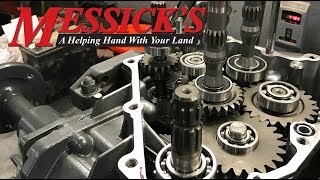
Kubota BX-series Transmission A Look Inside
Today we've got a BX that that has transmission issues. We're going to let you peek inside, take a look at what happens inside a transmission. This video is by no means instructional, it's just to give you a point of view and take a peek inside a transmission and let you see what's going on inside.
Secondary or Safety Air Filters on Kubota Engines. Specific to BX and Standard L-Series
These tractors from the factory will have single stage air filter boxes on them and if you go to parts some other product lines that Kubota has, you can actually add a secondary air cleaner inside of the primary one to help protect your engine.