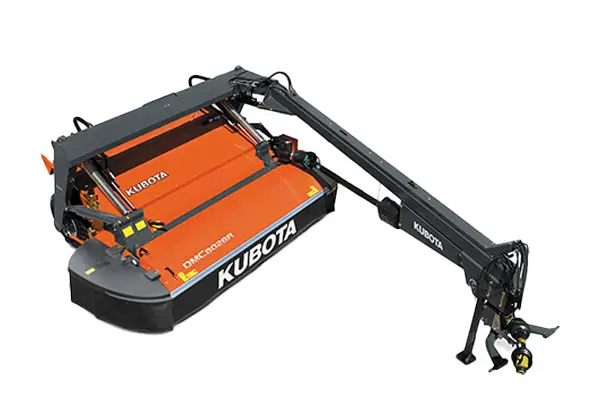

Kubota DMC8028R Walk Around
Tags : dmc8028 | dmc8028r | dmc8028t | dmc8032 | dmc8032r | dmc8032t | kubota |Neil: Neil from Messick's here. Now, today with Anthony Rhodes, our Kubota heavy tools product specialist. We're going to do a little a walk around today on a Kubota Disc Mower Conditioner. This is a DMC8028R roll-type machine that we have out here today. Anthony, can you tell us a little bit more about the other models that Kubota has in this line?
Anthony: Okay. You look at our mower conditioner lineup. We've got 9'2" up to 13'1" machines. We have a four-width conditioning with both Chevron rollers as well as semi-swing tines.
Neil: What is the difference between a roll and a tine-type conditioner? What kind of customer would want what type of conditioning system?
Anthony: Generally speaking, most people that do alfalfa are going to prefer the rolls as it's a little more gentle on the crop. However, our semi-swing tine can be configured. We can adjust our hood to adjust the aggressiveness on the conditioning from our tine conditioners as well as we can swap the poles to slow down that conditioner on the tine unit. Like I said, in general, Chevron rolls are going to be an alfalfa application. Mostly, semi-swing tines or a flail-type conditioner is going to be more of a grass hay.
Neil: Looking at this here, it's kind of hard to miss the huge springs for the flotation. How mechanically does the floatation work on this?

Anthony: Our floatation system is real simple here. We attach it back here at the back, and it attaches here at the front right above the cutter bar. Then we rigidly connect it back to the frame. It's like that on both sides. On the smaller units, it's in the one spring on each side. On the larger units, there's two springs on each side to help lift that cutter bar.
The way it works is, as the cutter bar floats to the field and follows the different undulations in the field, this spring that's linked back into the frame here, it actually helps lift up that cutter bar to help it follow the contours of the ground very well. You're going to see each side is completely independent of the other side. The right side here, it could float up 18.5” while the left side would get down about 6”. It’s going to follow those undulating conditions very well.
Neil: You can dial in and out your ground pressure then how, by changing that adjustment there in the back of the spring?
Anthony: Corrects. Right, back here at the back of the spring you typically you're going to set that one time for the customer, and that point you're going to be good to go but you can adjust. Typically, the general rule of thumb, you can be somewhere around 100 pounds weight on the ground there at the front. If someone wants to run faster, wants a little more down pressure to maintain better contact with the ground, we can adjust that. If someone wants to go slower and be a little more gentle on their machine, we can stretch the spring out for that application as well.
Neil: Each vendor has their own preferences for cutter bar design and Kubota's choice for this has been a low profile, thin cutter bar kit. Can you tell us a little bit about how it works?
Anthony: We've got a fully loaded cutter bar here. We've got intermediate gears in between each hub. These hubs can be removed from the top, four bolts underneath this disc and you can remove it right out the top if we have to service it.
Neil: There are shear hubs in there too, correct?
Anthony: Right through to the middle of this hub, we have a shear key which is our protection. If you do happen to get a loose rock up here between the disc or something, and something has to give, that keyway right there is what will shear. It is sealed inside of that hub. You’ve got to actually get a bolt up through the bottom with a washer, seals it all together. If something is going to have to give it will be sealed inside of that hub.
Neil: The triangle-shaped design, obviously that's fairly unique. I don't know that I've seen that before. What's the pros and cons to that?
Anthony: One thing that's really nice about our cutter bars from our disc mowers all the way up through our mower conditioners. We use triangular shaped disc, three blades, and we always rotate these discs in pairs. Counter-rotate them in pairs.
This is an eight-disc machine. We notice we- make sure. We can't rotate them there and you see how much overlap we have. Lay the blade, how much overlap we have here. That will help us with streaking issues, help us with better overlap, help us get that crop up across the cutter bar for a nice clean quality cut in our conditioners.
Neil: As you're turning here too, you have-- One knife is leaving the cut path when the next one is coming in, collects your-- There's always a knife cutting in there?
Anthony: Correct. There's always a blade out in front. This blade, by the time it is disappearing, the next blade is appearing. That's going to help us create lift, help get that crop up to get a nice quality cut. You look at a two-blade designed disc, they’re going to be times where both blades are going to be across that cutter bar and you're going to lose that effect.
Neil: This is a little bit different to a cutter bar because typically a lot of other companies would use modular designs. This is one solid oiled bath in the bottom. Do we run into problems with that when we run side hills and stuff?

Anthony: This is a fully watered cutter bar, one solid oil bath here. We're going to be able to check that, the oil bath at one place or here it sits a little there where we've been running the machine today. You can check that one place here, it acts like the Lucas Oil.
Neil: Like flows across the gears as well.
Anthony: Correct. The gears work it up through there. They say from the fact you can actually run these at 45-degree angle, and it will get enough oil up through there to keep running it. You notice, we have a gearbox here. It's tied to another gearbox in behind it, you can’t really see it but they actually pivot. They're attached to the rolls. It's a gear-driven roller system here.
It will allow it to spread if it has to. If you get it- run a rock through or something it will outspread to allow that obstacle to pass, but it is gear driven. The two rolls are gear driven. Also notice this spring here. This is where you're going to set your distance between your rolls as well as your tension between the rolls. You got a spring here and you've got one on the other side as well.
Cutting height adjustment is real simple. One point just on this side. You actually get the tool ratchet in the socket that comes with the machine, allows you to adjust this cutting height, either run it up or down here, in or out. It’s going run this pin up here and adjust your cutting height. You can obviously adjust these baffles in or out for the width of the swatch you want to leave behind as well as this rear one, you can just set that up or down. We've got it in the up opposition.
One of the really neat kit that we offer, it's a flip over widespread kit. You will take this last section here off. You put that on. You have a pin on each side of it, a spring-loaded pin, which allows you to flip it over. One side will be flat. You could windrow. The other side has veins on it. You flip that over and if you're on that side you take these shields out. Mount them up top here and it will pretty much spread it out just like you mowed and cut it in the same pass.
Neil: You can easily change from using that to not using it just by rolling the--
Anthony: Yes. All you do is you put a spring-loaded pin on this side, spring-loaded pin on that side. It flips, pop them back in, put these in. You're good to go. Take them out-
Neil: It's cool.
Anthony: -vice versa.
Neil: That is really easy to switch back and forth between the two.
Anthony: Yes. Very cool kit. Standard equipment on all of our mower conditioners is a swivel gearbox at the hitch. All of our side pole units, the 9'2" and the 10"6' machines come standard at 540. You can flip the gearboxes over, readjust the oil, change the yoke at the tractor, go to 1,000, and the larger units are the opposite. They become standard 1,000, so you can go vice versa.
What this does, it moves the pivot point back to the gearbox, allows you to make a really hard right turn, keep that PTO shaft straight at all times, as well as a hard left turn. You can make that hard left turn if you've got to go down the road, make a left hand turn into a field. You can easily do that with this and it's standard equipment on all of our machines.
Neil: You said something there that I think is important, this is set up for 540, right now?
Anthony: Correct.
Neil: If you want to switch it to a 1,000, literally, all you go to do is are you going to do is flip-flop the gearboxes?
Anthony: All you have to do, take these gearboxes out, flip them over, readjust the breather plugs, check the oil, make sure we adjust that correct. Put a 21 spline yoke on the front and you’re good to go.
Neil: Thousand RPM?
Anthony: All of our side pole machines have this drawbar hitch. All of our center pivot machines do have a two-point hitch, but you can get either option if you don't have a drawbar hitch on it. A left 12” or 13” and that's an option as well as a two-point hitch on the smaller machine, that's an option as well.
Neil: For somebody who hasn't run one of these before, might be looking at their very first disc mower, what would cause you to choose one hitch option over the other, is it purely personal preference?
Anthony: If somebody is going to be pretty much staying on their own field, sometimes it's easier to drop a pin, snug up the bolts and go to the field. I feel like you get a little bit more stability out of a two-point hitch, but there are a lot of people that want to transport between farms behind a pickup truck. It's not really easy to do that with a two-point hitch. That is really about transport is what drives a lot of people to the drawbar.
Neil: You may find a little bit more stability in performance from a two-point but-
Anthony: A drawbar can get a better--
Neil: -- a lot of flexibility from a drawbar version.
Anthony: Yes. Correct.
Notice, all of our hoses and cords are run underneath this shield on top of the main arm here. For some reason you've got to get to those, you take the shields off. You can set those right off. We don't snake them right down through the middle of this frame or anything like that. See, they came out the back right here.
Neil: If you have any need for hay tools, we can help you with any parts of service for your equipment. Give us a call at Messsick's, we're available at 800-222-3373, or online at messicks.com.